Many people appreciate the beauty of deep space photography, such as the swirling Andromeda galaxy or the Horsehead Nebula, but have no idea of how the photos are made. When I started taking pictures of the heavens I was surprised at the complexity involved. It was so much different than the normal “terrestrial” photography I was used to. I guess it shouldn’t be so surprising, considering the amazing photos of space that you can get nowadays right from your own backyard.
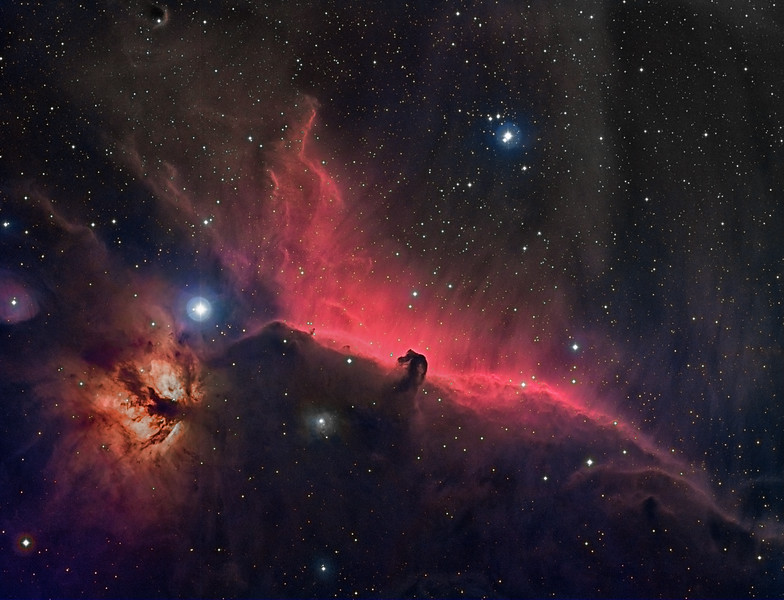
Horsehead Nebula – imaged from my porch
While the process that is used to create these photos is complicated, I think it is fascinating as well. For example, I could not see the Horsehead nebula through the telescope with my naked eye, yet I could still photograph it. How is that done? Well, there are many steps involved, often dependent on specific equipment or technology. At first glance it can seem overwhelming, but there is a logical order to everything. If taken step by step things become more manageable, and it is easier to keep focused on the overall objective. With that in mind, here’s a list of the steps I typically use in my astrophotography work flow.
Set up and align your scope
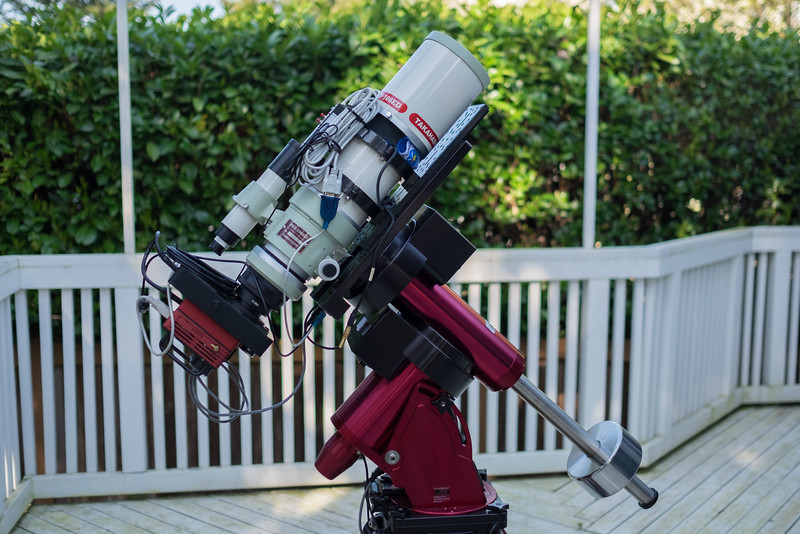
Takahashi FSQ-106 ED telescope, SBIG STT-8300 camera, and Paramount MX mount
My basic setup is an astronomy camera attached to a telescope that is being held by a motorized mount. The mount is what points the scope and it needs to be aligned to work properly and know where it is pointing. There are different types of mounts, and mine needs to be aligned to a point near the North Star (Polar Star) called the north celestial pole. Because the earth spins on an axis it causes our view of the sky to spin as well, with all the stars spinning around this north celestial pole. You can think of it as the earth’s rotational axis extended up into the night sky. My mount has what is called a “polar scope” built into it that I can look through to help physically point the mount to that point. This is called a polar alignment. Many motorized mounts have computers built in, and at this point it is common to slew (move) the telescope to 2 or 3 known stars and push a button to enter their positions into the mount. At this stage the mount is aligned and knows where it is pointing. My mount can actually have the camera take many photos automatically of different sections of the sky (usually 70-100), and have the computer use this info to fine tune it’s polar alignment. All this usually only has to be done once, and then every time the mount is turned on it is aligned and ready to go, as long as it hasn’t been physically moved.
Find your target
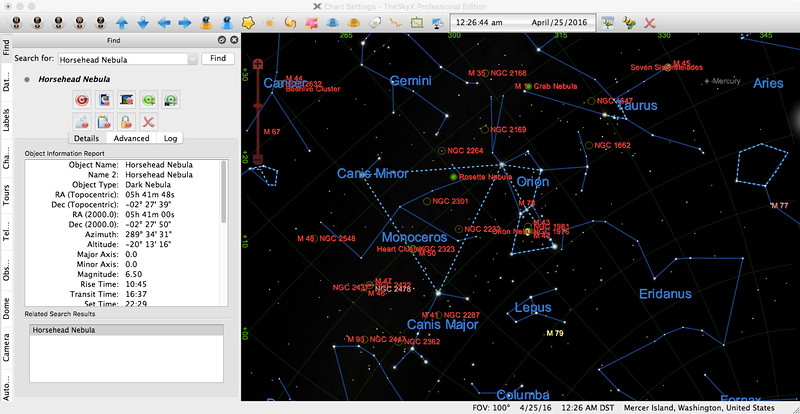
The Sky astronomy software
The next thing you do is decide what you are going to photograph. What you see in the sky will depend on your location, and also the time. The sky is constantly changing, both during the night and during the year. There are many software programs you can use to help plan what will be available to you during an imaging session. The program I use not only can tell you what objects are up in the sky above you at a particular time and how bright they are, but it can also control your telescope. It can center the object in your scope’s view, and then track it during the night as the earth rotates and causes the stars in the sky to move from east to west overhead (just like the sun does during the day).
Focus your telescope
Rear of the scope. Astronomy camera (red) takes the place of an eyepiece.
Sounds simple, right? Well, the problem is that the camera I use to take the photo is inserted into the eyepiece holder of the telescope. This means I cannot look through the scope while imaging, and besides, the focus point for the camera would not be the same as for my eye anyway.
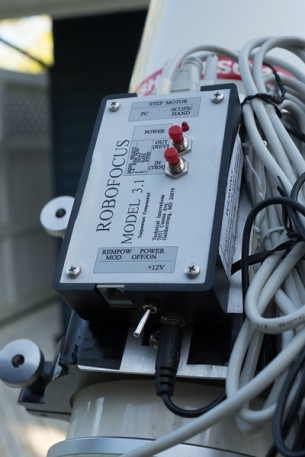
Robofocus digital focuser
The telescope focus needs to be adjusted based on the sharpness of the image made in the camera. So an image is taken and evaluated, and then focus is adjusted and a new image is taken and evaluated, and so on. This can be a very frustrating experience, especially considering the fact that the clarity of the night sky (called “seeing”) can vary naturally. This can make it hard to know when best focus is achieved. Fortunately, there are now electric focusers that can be digitally controlled by a computer. At the push of a button, the telescope will slew to a suitable focus star determined by the computer and focus automatically. It does this by taking a series of photos of the star as focus is adjusted from one side of a sharp image to the other. It then calculates the exact point of focus and returns the focuser to that point. It can also do several runs and give you an average if the seeing is bad. Problem solved!
Take the photo
We’re now at the picture taking stage, but there are some interesting decisions to make. For starters, color or black and white? There are some single-shot color astronomy cameras (that produce color images with a single exposure), but many, including mine, are black and white. They can still make color pictures (often with better results than a single shot color camera), but the process is more complicated, so let’s start with black and white. Usually the light from space is quite faint, so exposures need to be longer than what we typically use here on earth. Although the moon or some planets can require less than a one second exposure through a telescope, usually exposures need to be much longer…..minutes or even hours longer.

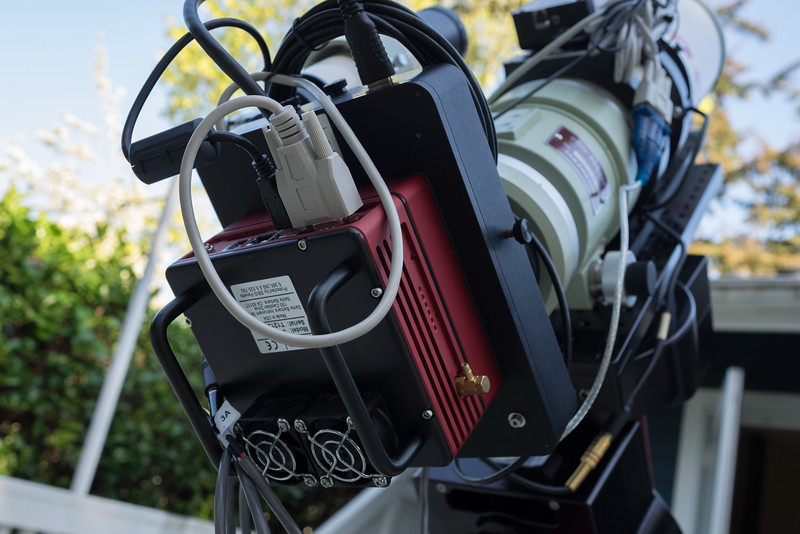
The autoguider/filter wheel sits between the camera and scope, and is connected by cables to the camera, the computer, and the mount.
I would really be asking a lot from my mount to accurately track an object for an hour, especially to sub pixel accuracy that would be preferred for a sharp photo. Fortunately, there are a couple of things I can do to help. First, I added an autoguider to my telescope set up. An autoguider uses a ccd chip to measure the position of a star in the telescope’s field of view, and adjusts the position of the mount every few seconds to keep the telescope pointing accurately. Again, this is run by a computer, so you set it up, push start, and let it do it’s thing. The guider talks to the mount independently, and you can watch a graph that plots the amount of corrections the guider makes. Another important technique I use to deal with long exposures involves image processing in the computer, something that has revolutionized astrophotography.
Image processing
The second solution to the long exposure problem is to take many shorter exposures instead, and stack or “sandwich” them together in the computer. Usually this means that the images being stacked together are faint and don’t contain much detail individually. By combining them, however, you add up all the image data for a detailed picture. This also explains how it is possible to take a photo of something you can’t see. If I were to look at most deep space objects through the eyepiece of my telescope, for example, I wouldn’t be able to see anything. With a digital camera, however, I can stack together many 10 or 15-minute exposures showing faint images to ultimately get pictures like you see in this article. For instance, the black and white picture of the Rosetta nebula (below) was made from 7 individual ten-minute exposures, which were then assembled into a single image using image-processing software. Total exposure time – 70 minutes. Generally, the more total exposure time you have the better your photos (more detail and less noise).
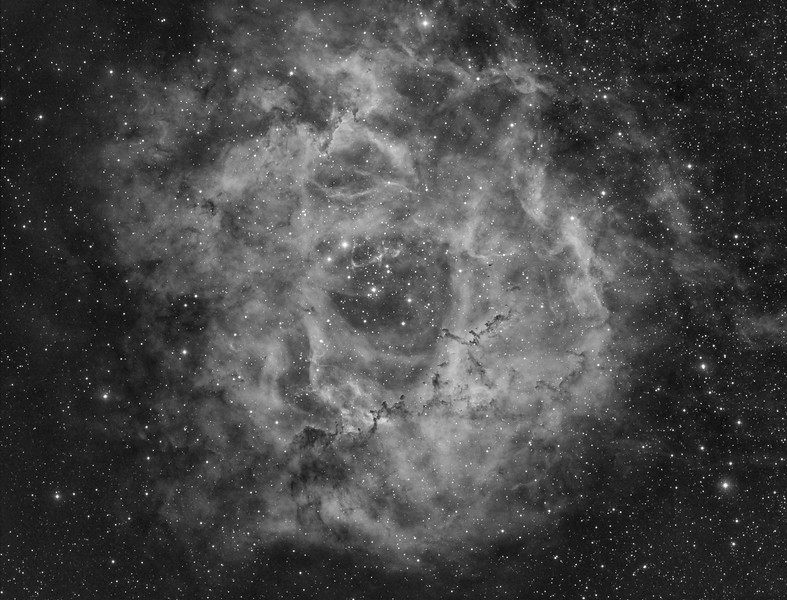
The Rosette Nebula from a composite of seven 10 minute exposures
Noise? That’s another issue that has to be dealt with in astrophotography. While cameras generate heat, it normally isn’t much of a problem when shutter speeds are less than a few seconds long. In astrophotography they are typically much longer, and the heat generated can create noise and degrade the image. Many astronomy cameras have a built-in cooler, and I typically cool my camera down to -20°C. Another way to reduce noise is to subtract it from the image using a computer. This is done by taking what we call a “dark frame”, which is an exposure with the exact same duration and temperature as the normal “light frame”, but with the camera shutter closed so no image is formed. The dark frame then is only made up of the image noise generated during the exposure, and this is subtracted from the light frame. So if you take 7 ten minute exposures, you subtract a ten minute dark frame from each exposure. To get an even more accurate dark frame, you can take many dark frame exposures and average them out to make a “master dark”.
Another negative affect on image quality is caused by what we call the light train of your telescope setup. When the light enters the opening of your scope, it has to travel through a long chain of equipment (scope tube, adaptors, focuser, camera, etc.) to finally reach the imaging chip. Because of the length, vignetting is a common occurrence, where the outer edges of the image will be darker than the middle, which often times can also be off-center. Specks of dust on the imaging chip can also cause small rings, or “doughnuts” to appear in the image. These effects, too, can be subtracted from the image, this time by taking what we call a “flat field”. An out of focus image is made of a uniform white background, which records the vignetting and all the dust doughnuts. This is then subtracted from the normal light frame (as is the previously mentioned dark frame). This gets rid of both the donuts and the vignette, and can dramatically improve the quality of the image. Remember when I mentioned the computer revolutionizing astrophotography?
Now, before using the flat field, we need to calibrate it as well, subtracting a dark frame just as we did to the light frame to eliminate camera noise. Because flat field exposures are typically much shorter than dark frames, it is possible to subtract a “bias frame” instead. This is the baseline noise made by the camera at it’s shortest possible exposure time. You simply close the camera shutter and make the shortest possible exposure your camera can make, and then subtract it from the flat field to calibrate it. Bias frames can also be used to calibrate images that were taken at different temperatures. Again, it’s better to make several bias frames, up to 20 or 30 even, and average them out for a “master bias”.
Taking a color photo
Okay, so now we know how to make a black and white photo from a black and white chip. Many individual images are made, with each one having a dark frame and flat field subtracted (with the flat fields also having bias frames subtracted). Then the images are stacked together in the computer. So, how do we make a color photo from a black and white chip? The answer is by adding a filter holder to your setup. This is typically a wheel that holds a variety of filters that can be rotated by the computer to put a specific filter in front of the camera. You perform the entire procedure as you do for a black and white photo, but you do it through a red, blue, and green filter. This means you end up with three times the exposures. First you combine all the red, blue and green filtered images separately in a computer processing program, and then you combine the three master images together to make a color image. You can also add a fourth filter to the sequence, depending on the object being imaged. A luminance filter, for example, can help define galaxies. Gas clouds that emit light, such as in some nebulas, can be revealed using various narrow band filters. The filter used depends on the type of gas making up the clouds. Hydrogen, oxygen or sulfur make up some of the gasses found, and each has a particular wavelength. Filters tuned to those narrow wavelengths (hence the name narrow band filters) can be used to help highlight them in the image. These images then are combined with the red, green, and blue ones for a more detailed, dynamic picture.
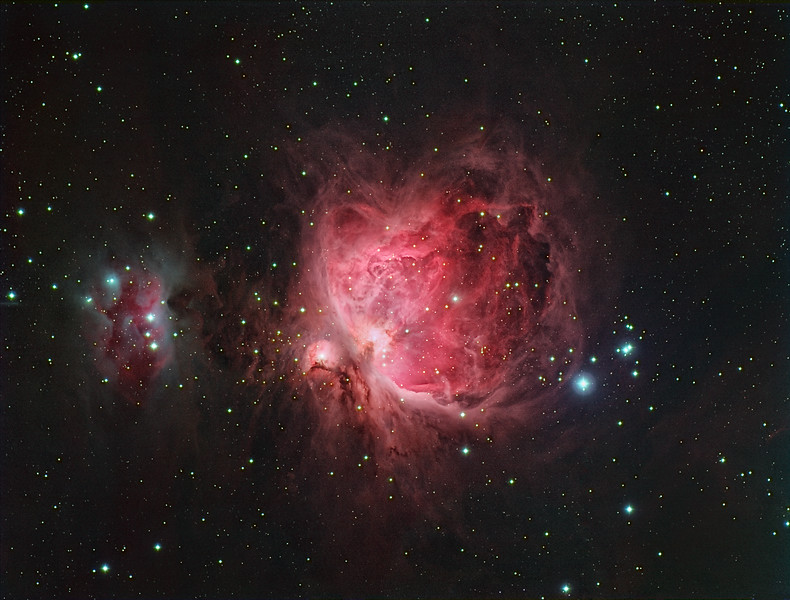
The Orion Nebula (M42)
Incidentally, filters can be used in black and white images as well. A Hydrogen-alpha filter was used in the Rosette image shown earlier to highlight the ring of gas and dust that surrounds the young hot stars at the center of the image. Using all these filters can result in a lot of images and exposure time for each final image. For example, the photo of the Horsehead Nebula at the beginning of this article was made up of around 100 exposures and almost 17 total hours exposure time. The image of the Orion Nebula above was around 200 exposures.
As you can see, image processing plays a big role in astrophotography. Subtracting dark frames and flat fields, and calibrating, aligning and combining images are essential, but there is more that can be done. Many astronomy processing programs have specialized tools to handle issues specific to astronomical images, such as dealing with light pollution gradients, star masks, and dynamic range compression. These can help bring out the best in images that often contain large contrast ranges and low signal to noise ratios.
Final results
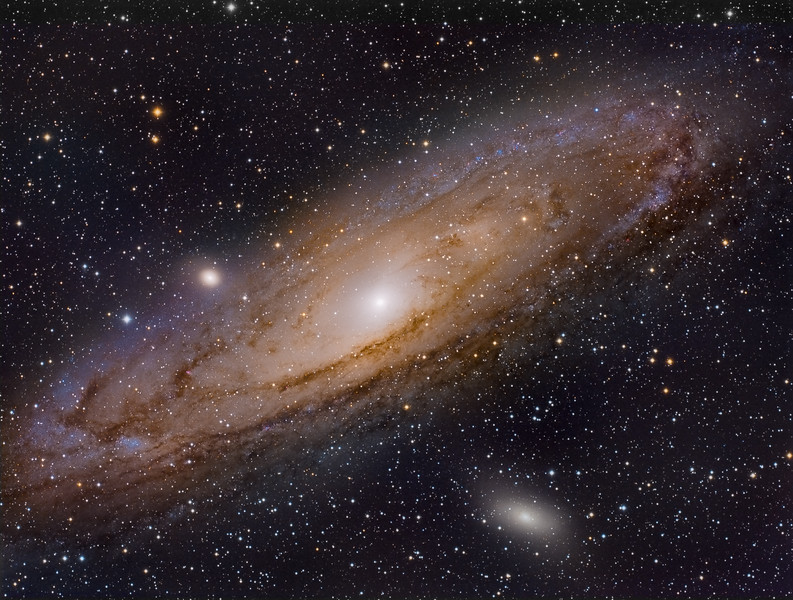
Andromeda Galaxy (M31)
The process outlined here may be complicated, but it is also systematic and reasonable. Still, I am amazed that it is possible to image galaxies and nebulas right from my back porch. Knowing that a telescope not more than 580mm long (less than 2 feet!) can show me the Horsehead nebula or the Andromeda Galaxy makes me feel a lot closer to the heavens above. And the photos themselves can be breathtaking. For me, understanding how they were made makes them even more so.

Great blog! I have been an observational amateur astronomer for a few years now. I have been wanting to make the transition into astrophotography since I first learned of it. Your blog gives a great overview of the process of setting up and taking the pictures. As you know, price is always a large factor (maybe the largest) in choosing equipment. For a follow-up, could you go over your equipment, why you chose what you did (I see you use a dedicated astrophotography camera rather than a DSLR), et cetera?
Great article! Beautiful images!
LikeLike
Hi, David,
Thanks for your comments. You’re absolutely right, price plays a big factor in choosing astronomy gear. Luckily nowadays there are more and more choices, and a wide range of price points. I find that generally there are two areas that are affected by price – convenience and picture quality, but overall both are much improved compared to just a few decades ago. Another factor to consider is the type of objects to be photographed. Most galaxies, for example, are much smaller targets than nebulas, and usually require more powerful telescopes and more accurate mounts. DSLR’s are a relatively new (and exciting) astrophotography tool, and the industry is still evolving to incorporate them. Astrophotography cameras at the moment are generally more expensive pixel for pixel, but have some added benefits, like cooling and the ability to use narrowband filters. Things are changing, though, so that might not always be the case.
Good luck with your transition to astrophotography, I hope you find it as inspiring as observing. The learning curve is a bit steep, but I think the rewards are worth it. Clear skies, Kit
LikeLike